So, recently I got a task at the university to create a program that resizes an image and inverts its pixels using AVX. I thought it could be interesting to document the process so that maybe I can help out someone who is trying to understand this instruction set ;)
This is what we’re aiming for:
 Left: original image, right: edited image
Table of contents
- What is AVX?
- Why use AVX for image processing?
- A quick introduction to AVX instructions
- Task description
- Header files
- Constants
- Resizing the image
What is AVX?
Advanced Vector Extensions (AVX) is an instruction set extension for x86 processors. It's designed to improve performance for floating-point and integer operations by allowing the processing of multiple data elements simultaneously. In simpler terms, AVX enables a CPU to perform certain mathematical and logical operations on multiple pieces of data at once, which is particularly beneficial for tasks that can be parallelized, such as image and signal processing.
AVX introduces new instructions and registers that operate on larger vector sizes compared to previous SSE (Streaming SIMD Extensions) instructions. While SSE instructions work with 128-bit vectors, AVX supports 256-bit and 512-bit vectors. This wider vector size allows for more data to be processed in parallel, leading to faster and more efficient computations.
Programs that leverage AVX can see significant performance improvements, especially in tasks that involve heavy mathematical computations, like graphics processing, scientific simulations, and multimedia applications. However, it's important to note that not all processors support AVX, so software using AVX instructions may have to check for compatibility or provide alternative code paths for non-AVX-capable systems.
If you would like to check if your processor supports AVX or not, check out this comprehensive guide so that you can figure out.
Why use AVX for image processing?
Parallel Processing
AVX enables simultaneous processing of multiple data elements in a single instruction. In image processing, this means that operations can be performed on multiple pixels at the same time. For example, applying a filter or transformation to a set of pixels can be done in parallel, significantly speeding up the overall processing time.Vectorization
AVX supports vectorization, allowing operations to be applied to entire vectors of data in a single instruction. This is particularly advantageous for image processing algorithms that involve repetitive operations on large datasets. Vectorization minimizes the need for explicit loops, reducing code overhead and improving overall efficiency.Increased throughput
The wider vector registers in AVX (256-bit or 512-bit compared to 128-bit in SSE) allow for processing more data in each instruction. This results in increased throughput, making it possible to handle larger image datasets or perform computations at a faster rate.
A quick introduction to AVX instructions
The AVX instructions operate on multiple data elements simultaneously, allowing for parallel processing and improved performance, especially in numerical and multimedia applications, therefore they are built a bit differently than what you may be used to with basic instructions and variables.
The _mm<bit_width>_<name>_<data_type>(parameters) syntax is used for Intel Intrinsics, which are low-level functions representing SIMD (Single Instruction, Multiple Data) operations. Let me break down the components:
bit_width: This specifies the width of the vector, which is either 128, 256, or 512 bits. If not specified, it defaults to 128 bits.name: This is the name of the specific SIMD instruction, indicating the type of operation to be performed.data_type: This specifies the type of data that the instruction operates on. Some examples include:ps: Packed Single-Precision (for 32-bit floating-point numbers)pd: Packed Double-Precision (for 64-bit floating-point numbers)ss: Single floatsd: Single doubleepi8/epi16/epi32/epi64: 8-bit/16-bit/32-bit/64-bit signed integerepu8/epu16/epu32/epu64: 8-bit/16-bit/32-bit/64-bit unsigned integersi128/si256: General 128-bit/256-bit vector
parameters: These are the inputs required by the specific SIMD instruction.
A couple of examples:
_mm128_add_ps(parameters): 128-bit packed single-precision addition (bit_width = 128, name = add, data_type = ps)._mm256_mul_pd(parameters): 256-bit packed double-precision multiplication (bit_width = 256, name = mul, data_type = pd)._mm_add_ss(parameters): Single-precision scalar float addition (bit_width = 128 by default, name = add, data_type = ss)._mm256_sub_sd(parameters): Subtract packed single-precision floating-point numbers (bit_width = 256, name = sub, data_type = sd)._mm256_add_epi32(parameters): 256-bit packed 32-bit integer addition (bit_width = 256, name = add, data_type = epi32)._mm_sub_epi64(parameters): Packed 64-bit integer subtraction (bit_width = 128 by default, name = sub, data_type = epi64).
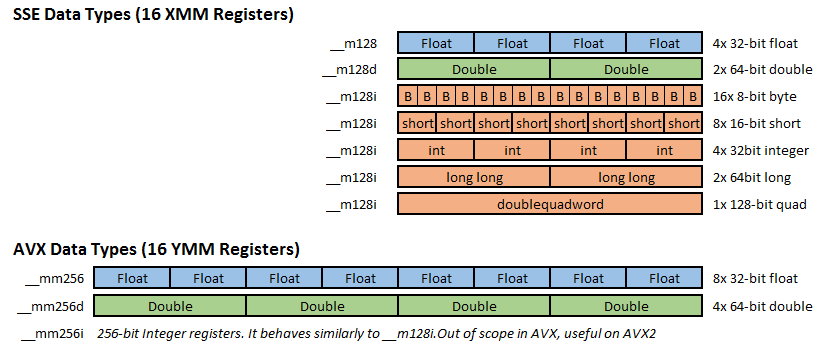 SSE & AVX Registers (source: CodinGame)
Task description
- Source image: space_image.bmp
- Dimensions: 1200 x 1200 pixel
- Format: Bitmap Image File
- To-do:
- Resize the image to 600 x 600 by calculating the pixels’ averages vertically and keeping every second pixel horizontally
- Invert each of the image’s pixels (white → black, black → white)
- Programming language used: C
- OS used: Linux
Header files
AVX only requires one additional header file to be added next to C’s basic headers, which is the immintrin.h . It provides intrinsics for SIMD (Single Instruction, Multiple Data) instructions, including those from Intel's Advanced Vector Extensions (AVX) and other SIMD instruction sets. The name "immintrin" is derived from "Immediate Intrinsics," and it's part of the x86 architecture.
According to this, the included header files of the code should look like this:
#include <stdio.h>
#include <stdlib.h>
#include <immintrin.h>
Constants
In C, creating named constants improves the code readability and maintainability, and ensures consistency. It also facilitates easy updates and helps avoid the use of "magic numbers" in the code.
Here are the following preprocessor directives with some explanations that are going to be used throughout the code:
#define HEADER_SIZE 54
In BMP (Bitmap) files, the header is a structure located at the beginning of the file that contains metadata and essential information about the image. Typically 54 bytes in size, the header includes details such as the file type, image dimensions (width and height), color depth, compression method, and the location of the image data. The header plays a crucial role in interpreting and displaying the image correctly, providing vital information for software to understand the format and characteristics of the associated bitmap image.
#define WIDTH 1200
#define HEIGHT 1200
#define NEW_WIDTH 600
#define NEW_HEIGHT 600
These data speak for themselves; they are used to define the current height and width and the new proportions of the resized image.
Resizing the image
Now resizing the image is not quite trivial, since it’s not really the “width = new width” approach. According to the requirements of the task the picture should be resized to 600 x 600 by calculating the pixels’ averages vertically and keeping every second pixel horizontally. Now, that sounds scary. What does that mean exactly? Let’s break it down.
Vertical resizing: Averaging the values of adjacent pixels stacked on top of each other
When you resize an image vertically, you are essentially reducing the number of rows of pixels. To do this, you take each pair of adjacent pixels in a column and replace them with their average. This process is repeated for each column, effectively averaging the values of adjacent pixels stacked on top of each other. The result is a vertically resized image with half the number of rows.
Horizontal Resizing: Keeping every second pixel value in each row, discarding the others.
In horizontal resizing, you are reducing the number of columns of pixels. To achieve this, you selectively keep only every second pixel value in each row, discarding the others. This means you retain the original value of the first pixel in a row, then discard the next one, keep the third, discard the fourth, and so on. This process is applied to every row in the image.
Now, what does that look like in code form?
void resizeImage(char *inputData, char *outputData) {
    for (int j = 0; j < NEW_HEIGHT; j++) {
        for (int i = 0; i < NEW_WIDTH; i++) {
            int source_index = ((j * 2) * WIDTH + (i * 2)) * 3;
            int dest_index = (j * NEW_WIDTH + i) * 3;

            __m256i sum_vec = _mm256_setzero_si256();

            for (int k = 0; k < 3; k += 32) {
                __m256i source_vec = _mm256_loadu_si256((__m256i*)&inputData[source_index + k]);
                __m256i next_vec = _mm256_loadu_si256((__m256i*)&inputData[source_index + 3 + k]);
                sum_vec = _mm256_add_epi8(sum_vec, _mm256_avg_epu8(source_vec, next_vec));
            }

            _mm256_storeu_si256((__m256i*)&outputData[dest_index], sum_vec);
        }
    }
}
The resizeImage function’s parameters are:
inputData: this parameter is a pointer to the pixel data of the original image. The function reads pixel values from this input data to perform the resizing operation.outputData: this parameter is a pointer to the array where the resized image data will be stored. The function writes the result of the resizing operation to this output data.
First, we loop through the pixels’ 2-dimensional array:
for (int j = 0; j < NEW_HEIGHT; j++) {
    for (int i = 0; i < NEW_WIDTH; i++) { ...
Then we calculate the source_index. The scaling in the calculation of source_index is introduced to skip every alternate row and column in the original image during the resizing process. The multiplication by 3 is due to the fact that each pixel in a typical color image is represented by three color channels: red, green and blue (RGB). Each channel requires a byte (8 bits) to represent the intensity level, so a pixel is often represented by three consecutive bytes.
int source_index = ((j * 2) * WIDTH + (i * 2)) * 3;
The dest_index variable is used to calculate the index in the output image (resizedData) where the computed pixel value will be stored.
int dest_index = (j * NEW_WIDTH + i) * 3;
Now, here comes the fun part—the AVX variables.
At first, we initialize an integer vector sum_vec which is used to accumulate the average of the two consecutive pixels' color values during the resizing process. Initially, we set all the values of the 256-bit integer vector to 0.
__m256i sum_vec = _mm256_setzero_si256();
After defining all the data that will be used throughout the resizing process, we can start doing just that. The loop iterates three times, but the loop variable k increases by 32 in each iteration. This is because each iteration processes 32 bytes (256 bits), which corresponds to the size of the AVX registers. We load a 256-bit vector (source_vec) from the original image data for the current pixel. After that, we load another 256-bit vector (next_vec) for the next consecutive pixel. Then in the end, we the average of the color values of the corresponding channels in source_vec and next_vec and accumulate the result in sum_vec. This is done for each RGB channel separately.
for (int k = 0; k < 3; k += 32) {
    __m256i source_vec = _mm256_loadu_si256((__m256i*)&inputData[source_index + k]);
    __m256i next_vec = _mm256_loadu_si256((__m256i*)&inputData[source_index + 3 + k]);
    sum_vec = _mm256_add_epi8(sum_vec, _mm256_avg_epu8(source_vec, next_vec));
}
As a final step of the function, we store the accumulated color values calculated in the sum_vec vector into the output image data (outputData).
In the latter section of this article, I'll demonstrate the implementation of the pixel color inverter function and delve into the program's main function.
 Sample picture caption