JavaScript has evolved a lot, going from a tool for making web pages cooler to a full-fledged programming language. Nowadays, we've got updates to the language, TypeScript gaining popularity, JSX being everywhere, and a need for lightweight runtimes for edge computing. Meet Bun, a new JavaScript runtime made for the modern world. It's fast, has built-in bundling and transpiling, and excellent support for TypeScript and JSX. Think of it as a competitor to Node.js and Deno, built on the speedy JavaScriptCore engine. This article will dive into Bun's main features, how it performs compared to other runtimes, and a guide on how to use it in your projects, pointing out what it's great at and where it could improve.
Table of Contents
- What is Bun?
- Bun’s Performance
- How to install Bun?
- How to start a Bun project?
- Bun vs Node.js
- How to install packages with Bun?
- Conclusion
What is Bun?
Bun is an all-in-one toolkit for JavaScript and TypeScript applications, providing a fast JavaScript runtime designed as a drop-in replacement for Node.js. It is written in Zig and powered by JavaScriptCore, resulting in significantly reduced startup times and memory usage.
The bun command-line tool includes features such as a test runner, script runner, and Node.js compatible package manager, all of which are faster than existing tools. Bun supports TypeScript and JSX out of the box and aims for compatibility with both ESM and CommonJS, as well as implementing standard Web APIs.
It is designed as a faster, leaner, and more modern alternative to Node.js, with ongoing efforts to achieve full compatibility with Node.js globals and modules. The long-term goal is to serve as a comprehensive toolkit for building JavaScript/TypeScript apps, encompassing a package manager, transpiler, bundler, script runner, test runner, and more.
Bun’s Performance
Bun is the new contester in the realm of JavaScript runtimes, meaning that the two most suitable comparisons for it should be Node.js and Deno.
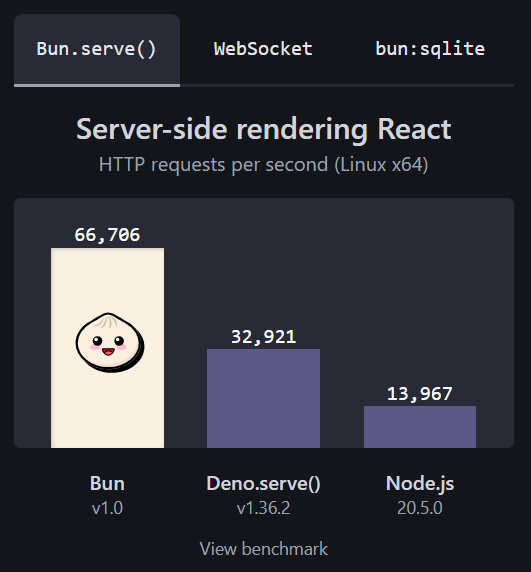
According to Bun’s official site Bun is around five times faster than Node.js and twice as fast as Deno for server-side rendering.

Throughout a very detailed evaluation of Bun’s performance compared to Node.js through a series of benchmarks, initially, Bun shows impressive speed, particularly in simple tasks like a "Hello World" scenario. However, as the complexity of tasks increases, Bun's initial advantage diminishes.
In the "dummy framework test", Bun proves to be consistently two times faster than Node.js across different scenarios, maintaining commendable Requests Per Second (RPS) figures. However, when evaluating a QR code generator API, the results are surprising. Despite initial expectations, Bun lags behind Node.js in performance, with both platforms achieving a mere 50 RPS in the QR generator API scenario.
The article discusses potential arguments, including the test system being a MacBook and the intensive nature of QR code generation. Despite the unexpected outcome of the QR generator API test, Bun is acknowledged for its superior performance in less resource-intensive scenarios.
In a nutshell, Bun outperforms Node.js and Deno in terms of requests per second and database operations. It excels in handling concurrent connections, achieving significantly higher speeds. While there may be debates about the test scenarios, Bun consistently emerges as the winner. Its focus on speed is evident in performance tests, including server-side rendering, WebSocket chat servers, and loading large tables. Bun uses JavaScriptCore, found in Safari, and is designed to start quickly, making it ideal for dynamically scaling applications. Ongoing efforts aim to further enhance its speed and efficiency.
How to install Bun?
Before you jump into the installation process, it's crucial to mention that currently, only the Bun runtime is compatible with Windows. For a detailed guide on installing Bun on Windows, take a look at this article.
For Linux and macOS users, the setup is quite easy:
curl -fsSL https://bun.sh/install | bash
Once Bun’s installed, the simplest method to confirm a successful installation is by checking the version:
bun --version
How to start a Bun project?
Let’s see how Bun works with a real example. First, choose a folder you would like to start your project in. Then use the following command to add Bun to it:
bun init
You will be asked to add a name to your package, or if you’re fine with what you’ve named your project folder previously, you can just leave it empty and hit enter.
The next data you will be required to add is the entry point to your project. By default, it will assume you’ll use TypeScript. If that’s the case, a tsconfig.json file will be added. If you plan on using JavaScript, no problem. Just enter a name with a .js extension and you’re good to go. Of course, in this case, a jsconfig.json file will be generated.

Initially, you will be granted a file with a console message.
To execute your source file, enter the following command:
bun run index.ts
Bun allows direct execution of .ts and .tsx files without extra configuration. It internally transpiles TypeScript files to JavaScript before execution. While it doesn't typecheck files, transpiling might not be necessary for production as Bun handles it internally. However, if using Bun for development and targeting Node.js or browsers in production, transpiling is still required.
You can run your .js and .jsx files the exact same way.
A quick side note here. Bun allows different ways to run your projects. For example, you can ignore the run keyword and use the following line:
bun index.ts
Or, if you’d prefer to have your own keyword instead of having to enter the file name all the time, you can add the following to the package.json file:
"scripts": {
    "start": "bun run index.ts"
},
Having a start script really minimizes the effort of execution:
bun start
Bun vs Node.js
Bun offers a comprehensive toolkit with enhanced features, emphasizing speed, compatibility, and streamlined development workflows compared to Node.js, that’s what the following table represents more in detail:
| Feature | Bun | Node.js |
|---|---|---|
| Runtime Language | Written in Zig | Primarily written in C++ |
| JavaScript Engine | JavaScriptCore (JSC) | V8 |
| Startup Speed | Up to 4x faster | Slower startup due to V8's optimization |
| Transpiler | Integrated transpiler for .js, .ts, etc. | Requires external TypeScript transpilation |
| Module System | Supports both CommonJS and ES modules | Traditionally associated with CommonJS |
| Web APIs Support | Built-in support for Web standard APIs | Limited native support until Node.js v18 |
| Hot Reloading | Supports in-place code changes | Disruptions in connections for Node.js |
| Package Manager | Built-in, significantly faster | npm, slower installation speeds |
| Bundler | Integrated bundler with JavaScript macros | Relies on third-party tools like Webpack |
| Test Runner | Built-in test runner compatible with Jest | Traditionally relies on Jest for testing |
Let's set up a basic HTTP server, responding differently based on the requested URL path. The server listens on port 3000 and, when a request is received, it parses the URL and checks the path. If the path is '/', it responds with 'Home page!'; for '/blog', it responds with 'Blog!'. If the path doesn't match, it returns a 404 Not Found status.
const server = Bun.serve({
    fetch(req) {
        const url = new URL(req.url);
        if (url.pathname === "/") return new Response("Home page!");
        if (url.pathname === "/blog") return new Response("Blog!");
        return new Response("404 Not Found");
    },
});
console.log(`Listening on http://localhost:${server.port}`);
The same basic server code would look like this in node.js:
import * as http from 'http';
import { IncomingMessage, ServerResponse } from 'http';

const server = http.createServer((req: IncomingMessage, res: ServerResponse) => {
  const url = new URL(req.url || '', 'http://localhost:3000');

  if (url.pathname === '/') {
    res.end('Home page!');
  } else if (url.pathname === '/blog') {
    res.end('Blog!');
  } else {
    res.statusCode = 404;
    res.end('404 Not Found');
  }
});

const PORT = 3000;

server.listen(PORT, () => {
  console.log(`Server listening on http://localhost:${PORT}`);
});
Now, a couple of things can be recognized quite fast comparing the two codes:
Creating a Server:
Bun:
- Initiates the server using the
Bun.servemethod. - Utilizes an object equipped with a
fetchmethod to manage incoming requests. - Doesn’t need a
httpimport in the code
- Initiates the server using the
Node.js:
- Uses the
http.createServermethod for server creation. - Uses a callback function to handle incoming requests.
- Uses the
Handling Requests:
Bun:
- Manages incoming requests by utilizing the
fetchmethod. - Accepts a
reqparameter containing information about the incoming request.
- Manages incoming requests by utilizing the
Node.js:
- Handles incoming requests through a callback function.
- Uses
reqandresparameters representingIncomingMessageandServerResponseobjects, respectively.
Crafting Responses:
Bun:
- Handles responses with the
Responseconstructor. - Provides a string defining the response body.
- Handles responses with the
Node.js:
- Concludes responses using the
res.endmethod. - Optionally sends a response body via a provided string.
- Concludes responses using the
Dealing with Errors:
Bun:
- Handles a 404 error by returning a
Responsewith the body set to "404 Not Found"
- Handles a 404 error by returning a
Node.js:
- Handles a 404 error by setting
res.statusCodeto 404 and usingres.endto dispatch a "404 Not Found" message.
- Handles a 404 error by setting
Launching the Server:
Bun:
- Sets the server into motion by invoking the
Bun.servemethod.
- Sets the server into motion by invoking the
Node.js:
- Initiates the server with the
http.createServermethod, followed by invoking thelistenmethod on the server object.
- Initiates the server with the
How to install packages with Bun?
According to the Bun official documentation:
The
bunCLI contains a Node.js-compatible package manager designed to be a dramatically faster replacement fornpm,yarn, andpnpm. It's a standalone tool that will work in pre-existing Node.js projects; if your project has apackage.json,bun installcan help you speed up your workflow.
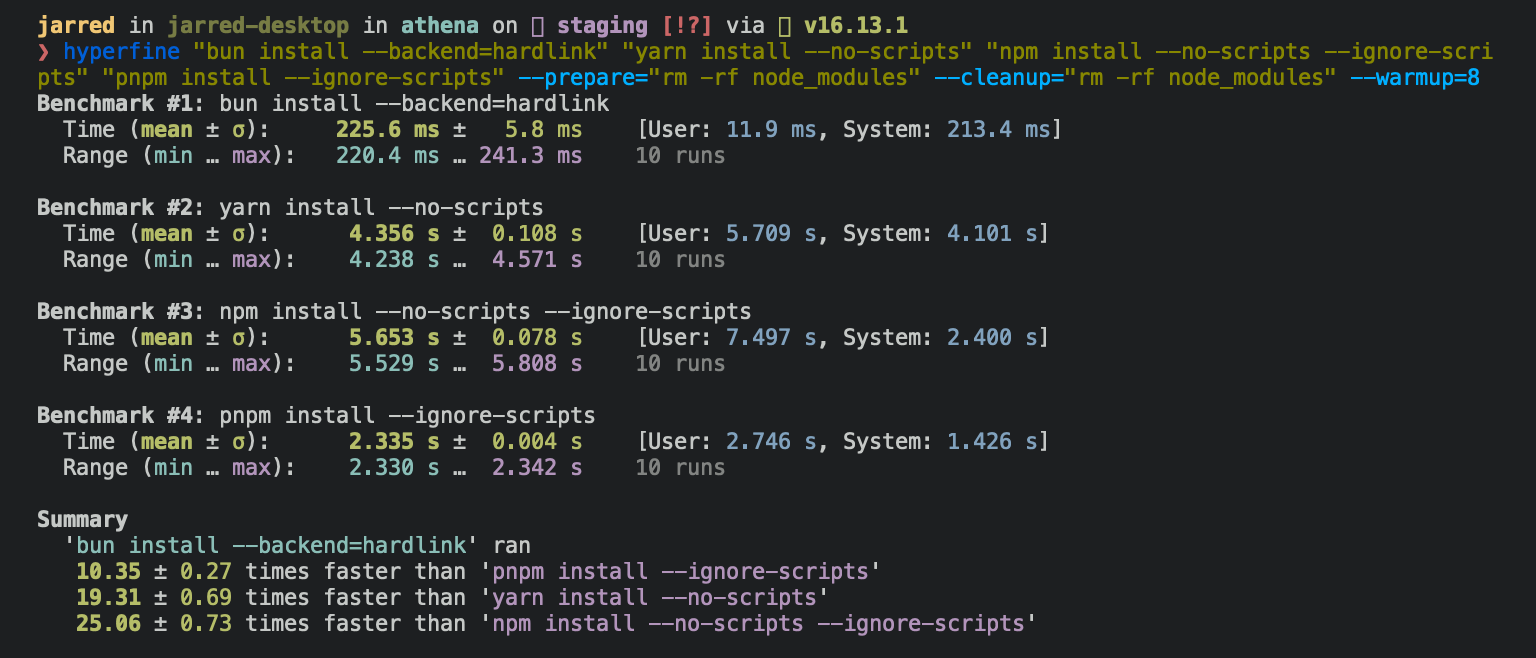
The documentation also states that the bun install command is 25x faster than the npm install

Some of the bun package manager commands:
| Bun Command | Purpose |
|---|---|
| bun install | Install all dependencies from package.json |
| bun add <package> | Add a new package to the project |
| bun add <package> --dev | Add a new development-only package |
| bun remove <package> | Remove a package from the project |
| bun update <package> | Update a specific package to its latest version |
| bun run <script> | Execute a specified script from package.json |

Bun aims to have complete Node.js API compatibility. They’ve already implemented loads of functions and packages that you can use with Bun, although there are a few that are not compatible yet. They have a list of the statuses of the built-in or soon-to-be built-in modules.
Conclusion
Bun is still in its early stages although it already has lots of attention-grabbing features, like its speed, the direct execution of .ts and .tsx files, its fast package manager, and its simplicity. There is a long way to go though, since it still has bugs and doesn’t support certain packages, so I wouldn’t recommend shifting all your projects to Bun just yet. I can definitely recommend playing around with it in smaller ones though, it will make a change and probably provide a nicer user experience.
 Sample picture caption